Notifications & Webhooks
Configure and retrigger notifications (webhooks between systems) directly in the Nitrobox Webportal. Learn more about how to activate and retrigger notifications, and where to find details about notifications, status, attempts, and manual retriggering.
To get to the notifications section, navigate to: Configuration > Global > Notifications
Click the menu item "Notifications" and the "Notification Overview" opens. The page consists of three sections: security configuration, notification configuration and notification and status overview.
Set the security configurations
To use the notifications function, you must first set up the security configuration. Click the "Edit" icon in the top right corner. The security configurations overlay opens. Fill in the data fields.
Select "Oauth" from the "Type" drop down menu to configure your security. Then add a "Scope" if required by your system.
Now set the token URL needed for your token endpoint and fill in the "Client ID" and "Client Secret" data fields.

Note: This screenshot is for clarification only and includes an example Nitrobox auth configuration. Please fill in your own data.
Configure notification events
In the second section you configure the notification events you want to be informed about. Click the "Add" button on the left side to create a notification. The "Notification route" overlay opens.
Select the notification event name from the "Notification" drop down menu. Then enter the URL to which the webhook should be sent. Click "Save" to save the new notification event and "Discard" if you do not want to proceed with the operation.

Learn more about what notifications exist and how their payloads look like in the Nitrobox API documentation.
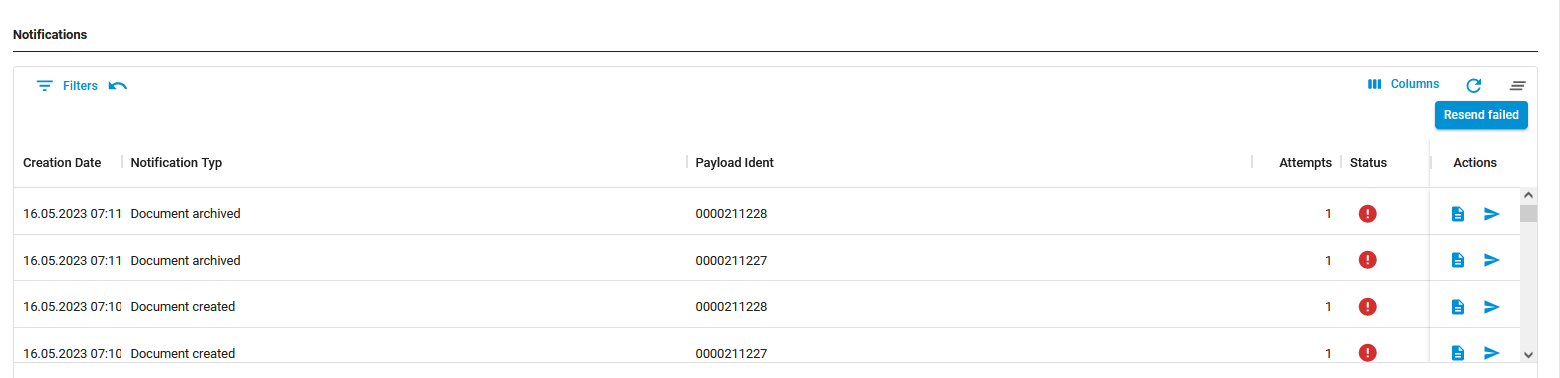
Notification status overview
In the third section you find an overview table of all notifications that were sent to your system listing all details from creation date, number of attempts to status.
If you want to search for specific notifications use the "Filter" function in the top left of the section.
Resend unsuccessful notifications
To check if a notification sending was successful, take a look at the "Status" column at the end of the respective entry. If an attempt was unsuccessful, e.g. because your system was unavailable for a certain period you can retrigger the notification. Go to the "Actions menu" at the end of the respective entry and click the "Resend" icon.
If you want to retrigger all failed notifications in one go, click the "Resend failed" button in the top right of the section.
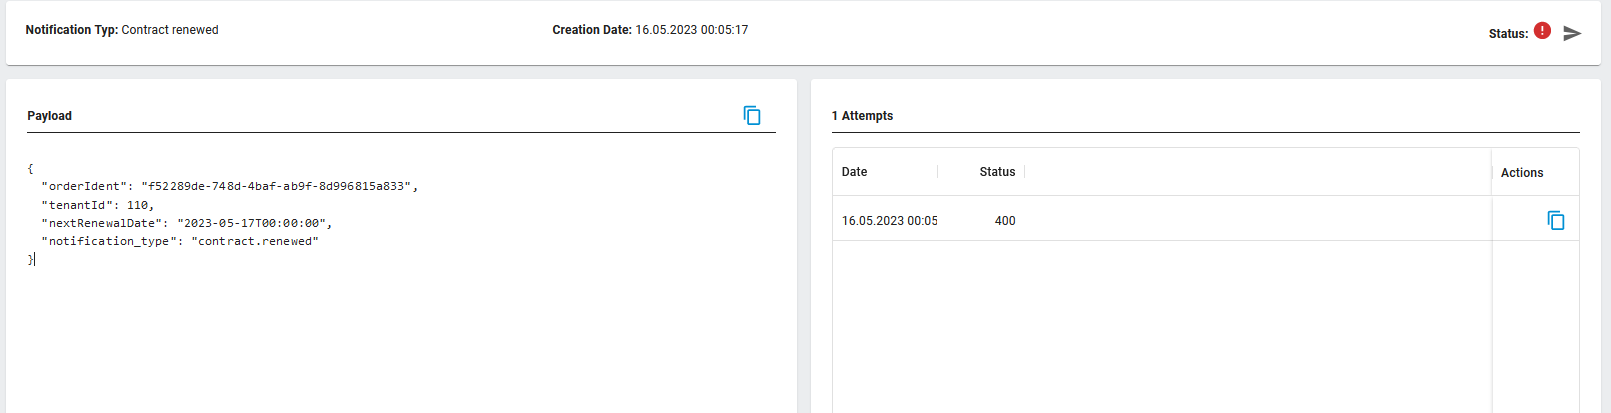
Check notification details
If you want to take a look at the notification details to see what was send and what your system responded, go to the "Actions menu" at the end of the respective entry. Click the "Details" icon and the "Notification details" page opens.
Notification meta data
In the top section you find the notification meta information: what kind of notification was sent, at what time and the notification status. If it is unsuccessful, you can click the "Resend" button in the top right to retrigger the sending.
Payload details
In the section below on the left you find the payload details that were sent. If you want to copy them, click the "Copy to clipboard" icon.
Notifications attemps log
To the right of the payload section is the notification attemps log that lists all attempts that have been carried out (date, time and the status code your system has responded with). To check what your system had answered, click the "Copy HTTP response to clipboard" button at the end of the respective entry and paste the data into your local note app.
Updated 2 months ago