Payment Assignment
The Nitrobox Platform offers a smart payment assignment feature to match payments to documents and orders automatically. Nevertheless, you can also assign payments manually. Let's check out, how that works.
Categorize first, then assign a paymentBefore you can assign a payment, you have to categorize it first. Otherwise, an assignment is not possible.
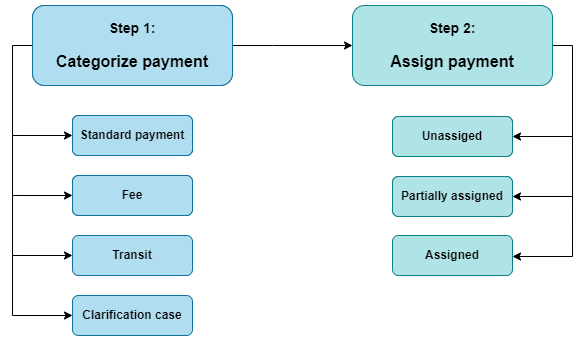
Assign payments in two steps: Categorize first, then assign the transaction
The graphic shows only a small selection of standard payment categories. To see all payment categories, navigate to: Configuration > Payment Categories > Payment Category Overview
Click the navigation item “Payment Categories” to get to the "Payment Category Overview".
Step 1: Categorize payments
To categoritze a payment, go to the “Payment" section of the main navigation on the left side. Click the navigation item “Transactions” to get to the "Payment Transactions Overview". Depending on how many transactions you have listed in your overview, use the filter function to find the required payment transaction more quickly, e.g. filter per sender, amount, category, or booking/ value date .
Go to the end of the respective payment entry, click the „Actions" button and select "Assign category". An overlay opens. Now, select the category type from the drop-down menu and click the "Assign" button to categorize the payment. The payment category is now visible in the overview table in the "Category" column. If you want to cancel the assignment action, click "Discard" and the overlay will close.
Step 2: Assign payments
There are three different assignment status variants for the payment transactions: unassigned, partially assigned, and assigned.
Ater you have assigned a category to the payment transaction, you can proceed with assigning the payment to a document or an order.
To assign payments manually, go to the “Payment" section of the main navigation on the left side. Click the navigation item “Transactions” to get to the "Transactions Overview". Depending on how many transactions you have listed in your overview, use the filter function to find the required plan more quickly, e.g. filter per sender, price ,or description.
If you found the payment you want to assign, click either
- on the "Actions" button at the end of the respective transaction entry and select "Assign payment"
- or click the "Details" button at the end of the respective transaction entry to open the transaction detail page. Then click the "Assign payment" button in the top right corner of the details page.
A payment can be assigned to an invoice or an orderAssign it to an order, if the payment is a deposit/ down payment.
Now your are on the "Assign payment" page, where you can see all details related to that transaction. In the lower part of the page the potential entries are listed. Now, select the assigment target "invoice" or "order" from the drop-down menu. Depending on how many items you have stored in your Nitrobox account, use the filter function to find the required document or order more quickly.
If you located the correct entry, click "Select" at the end of the entry and click "Save". Depending on how the payment amount matches the document or order, the payment amount is then assigned the status "partially assigned" or "assigned in the overview.
To cancel the action, click "Discard".
Change the category of a clarification case payment
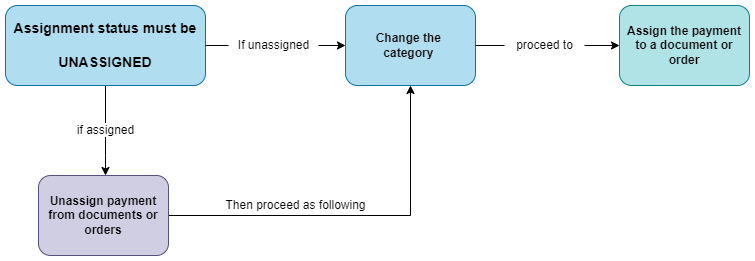
When a clarification case is resolved, you will probably want to change the category from clarification case to e.g. standard payment.
But before you can do that, you need to check that the transaction is NOT assigned to a document or order. If that is the case, you can change the category according to step 1.
If the payment is assigned to a document or an order, you need to unassign it first. Then you can change the category, save it and assign the transaction to the appropriate document or order.
Updated 3 months ago